学习了现代操作系统课程,完成了Mylist应用的开发,趁有时间将实现过程总结一下。
MyList (上)
Week1
实验要求:
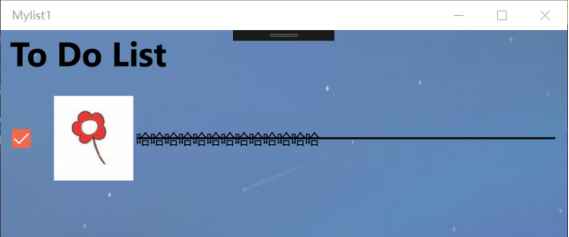
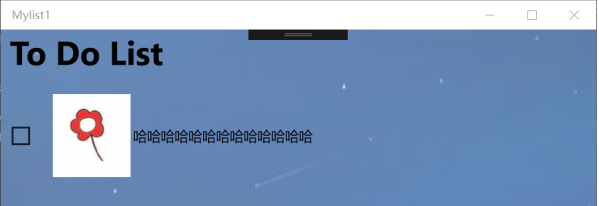
- 在MainPage上放置CheckBox和line两个控件,当CheckBox被勾选时line出现,取消勾选则line消失。
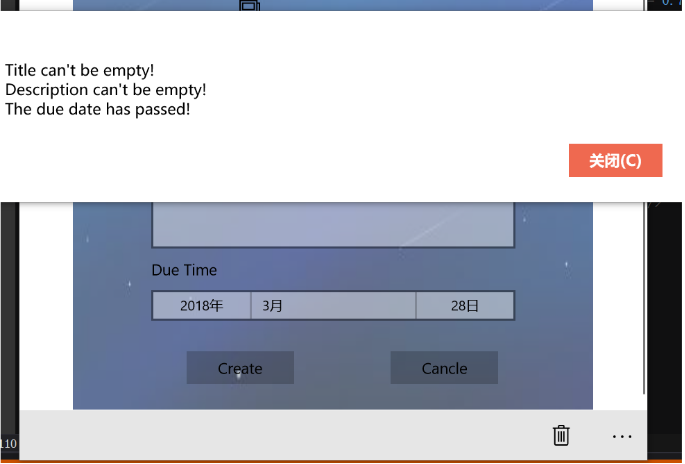
- 新建一个NewPage 点击create按钮时,检查Title、Description是否为空,DueDate是否正确(是否大于等于当前日期)。如果不正确,弹出对话框,显示错误信息。
- 点击Cancel按钮时,Title、Description置空,DueDate置为当前日期。
实验步骤:
在Mainpage.xaml里面添加CheckBox和Line控件,将Line的
Visibility与CheckBox绑定即可:1
Visibility="{Binding ElementName=Box1, Path=IsChecked}"
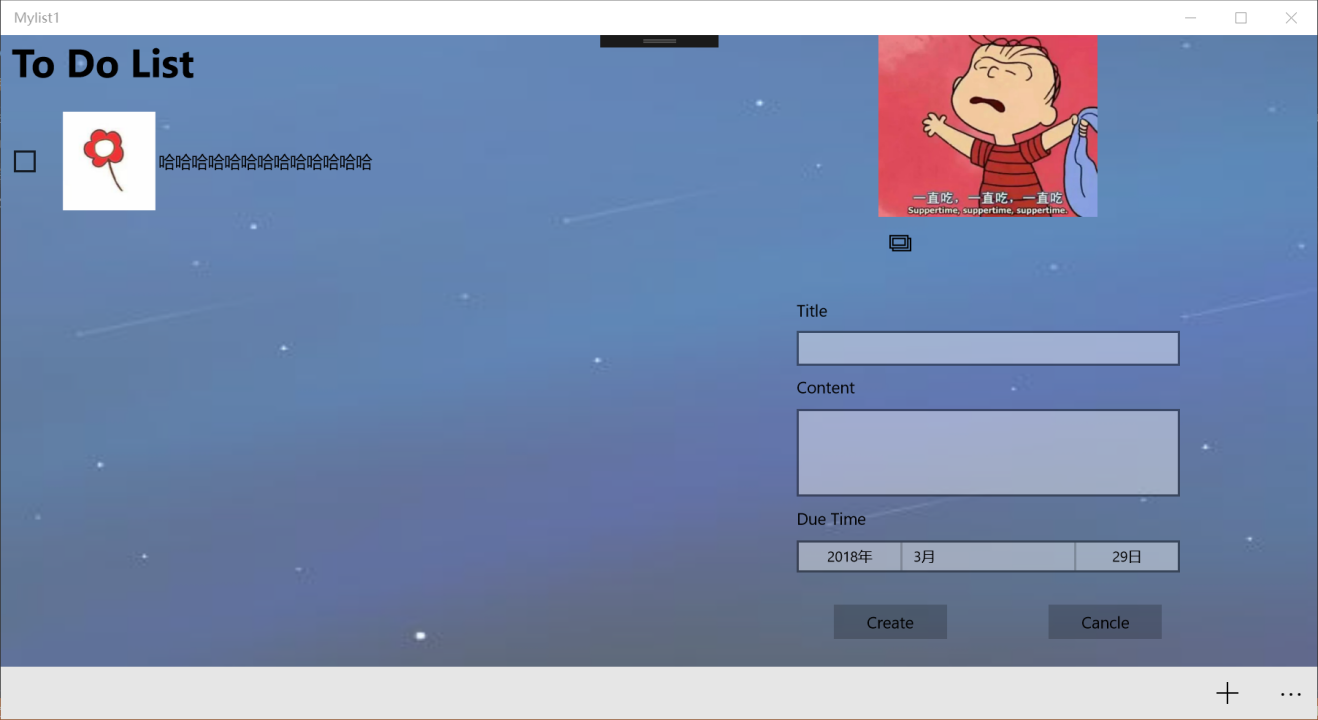
新建一个Newpage.xaml,放置一些TextBlock和TextBox控件以显示 Title,Description及其输入框,放置一个DatePicker作为DueDate的选择。自己调整布局。
在Newpage.xaml中放置两个Button空间,一个
Create一个Cancle,在Newpage.xaml.cs中实现对应的Click事件:1
2
3
4
5
6
7
8
9
10
11
12
13
14
15
16
17
18
19
20
21
22
23private void CreateTask(object sender, RoutedEventArgs e)
{
WrongMessage = "";
if (Title.Text == "")
{
WrongMessage += "Title can't be empty! \n";
}
if (Description.Text == "")
{
WrongMessage += "Description can't be empty!\n";
}
if (dp.Date < DateTime.Now.Date)
{
WrongMessage += "The due date has passed!";
}
}
private void reset(object sender, RoutedEventArgs e)
{
Title.Text = "";
Description.Text = "";
dp.Date = DateTime.Now.Date;
}
效果图:
- CheckBox与Line的绑定:
- 创建失败信息提示:
Week2
实验要求:
- 完成Mainpage、Newpage两个界面之间的Navigation:
- 点击Mainpage底部的“+”按钮,跳转到Newpage
- 点击Newpage顶部的“←”按钮,跳转回Mainpage
- 界面优化:
- 界面宽度发生改变时,界面整体始终居中;
- 界面右侧需有滚动条。
- 为界面添加背景。
实验步骤:
在MainPage底部添加AppBarButton,Icon为
Add,在在Newpage.xaml.cs中实现对应的Click事件:1
2
3
4
5
6<Page.BottomAppBar>
<CommandBar>
<AppBarButton x:Name="ABB" Icon="Add" Label="Add" Click="AddAppBarButton_Click" />
<AppBarButton x:Name="DeleteAppBarButton" Icon="Delete" Label="Delete" Click="DeleteButton_Clicked" Visibility="Collapsed"/>
</CommandBar>
</Page.BottomAppBar>1
2
3
4
5
6
7
8
9
10
11
12
13
14private void AddAppBarButton_Click(object sender, RoutedEventArgs e)
{
if(second.Visibility == Visibility.Visible) //若主页面第二部分可见,则跳转到主页面
{
create.Content = "Create";
ViewModel.SelectedItem = null;
Frame.Navigate(typeof(MainPage)); //此处为跳转到主页面,详情部分会变成空白以待输入
return;
}
ViewModel.SelectedItem = null;
Frame.Navigate(typeof(NewPage)); //否则跳转到NewPage
}判断页面是否显示返回键,若显示,则点击返回键可返回主页面。
关于界面优化:
- 界面整体居中:
Grid HorizontalAlignment="Center" - 右侧添加滚动条:
<ScrollViewer ScrollViewer.VerticalScrollBarVisibility="Auto" > (拥有滚动条的整体) </ScrollViewer> - 为界面添加背景:
1
2
3<Grid.Background>
<ImageBrush ImageSource="Assets/th.jpg" Stretch="Fill" Opacity="0.7"></ImageBrush>
</Grid.Background>
- 界面整体居中:
Week3
实验要求:
- 实现自适应UI:
- 窗口宽度小于600只显示文字和方框
- 窗口宽度大于600小于800显示文字图片和方框
- 窗口宽度大于800显示文字图片方框以及NewPage。
- 窗口宽度大于800时点击
+不会跳转到NewPage。(此部分代码在上面实现跳转功能时已给出)
实现数据绑定:
创建MVVM模式,建立Model类和ViewModel类,Model类中保存每一个Item的数据。ViewModel保存所有的Item以及对Item列表进行增删改。实现图片的上传,运用FileOpenPicker,BitmapImage等类。
实现步骤:
采用VisualStateGroup为MainPage设定3种状态:
1
2
3
4
5
6
7
8
9
10
11
12
13
14
15
16
17
18
19
20
21
22
23
24
25<VisualStateManager.VisualStateGroups>
<VisualStateGroup x:Name="VisualStateGroup">
<VisualState x:Name="VisualStateMin0">
<VisualState.StateTriggers>
<AdaptiveTrigger MinWindowWidth="0"/>
</VisualState.StateTriggers>
<VisualState.Setters>
<Setter Target="second.(UIElement.Visibility)" Value="Collapsed"/>
<Setter Target="first.(Grid.ColumnSpan)" Value="2"/>
</VisualState.Setters>
</VisualState>
<VisualState x:Name="VisualStateMin800">
<VisualState.StateTriggers>
<AdaptiveTrigger MinWindowWidth="800"/>
</VisualState.StateTriggers>
<VisualState.Setters>
</VisualState.Setters>
</VisualState>
</VisualStateGroup>
</VisualStateManager.VisualStateGroups>
解释一下上面的代码,首先将整个页面以宽度800为分界线,设置两种状态,以页面宽度为触发条件,大于800时不作改变,大于0小于800时将第二部分隐藏,并将标题左边的图片隐藏。
1
2
3
4
5
6
7
8
9
10
11
12
13
14
15
16
17
18
<VisualStateManager.VisualStateGroups>
<VisualStateGroup>
<VisualState x:Name="state2">
<VisualState.StateTriggers>
<AdaptiveTrigger MinWindowWidth="600"/>
</VisualState.StateTriggers>
</VisualState>
<VisualState x:Name="state1">
<VisualState.StateTriggers>
<AdaptiveTrigger MinWindowWidth="1"/>
</VisualState.StateTriggers>
<VisualState.Setters>
<Setter Target="image.Visibility" Value="Collapsed"/>
</VisualState.Setters>
</VisualState>
</VisualStateGroup>
</VisualStateManager.VisualStateGroups>
然后在first部分中(我将MainPage划分为了first–标题部分和second–详情部分)再以宽度600为分界线,设置两种状态,宽度大于600时正常显示first页面,宽度小于600时将标题左边的图片隐藏。
创建一个ListItem类作为Model,放在Model文件夹下,用来保存Todolist中每一项的详细信息。
1
2
3
4
5
6
7
8
9
10
11
12
13
14
15
16
17
18
19
20
21
22
23
24
25
26
27
28
29
30
31
32
33
34
35
36
37
38
39
40
41
42
43namespace Mylist1.Models
{
public class ListItem
{
public string id;
public string title
{
get;
set;
}
public string description
{
get;
set;
}
public bool completed
{
get;
set;
}
public DateTime date
{
get;
set;
}
public ImageSource imageSource
{
get;
set;
}
public ListItem(string title, string description, DateTime date, ImageSource imageSource)
{
this.id = Guid.NewGuid().ToString();
this.title = title;
this.description = description;
this.imageSource = imageSource;
this.date = date;
this.completed = false;
}
}
}创建一个ListItemViewModel放在ViewModel文件夹下,用来管理所有Item的信息。
1
2
3
4
5
6
7
8
9
10
11
12
13
14
15
16
17
18
19
20
21
22
23
24
25
26
27namespace Mylist1.ViewModel
{
class ListItemViewModels
{
private static ListItemViewModels instance;
public static ListItemViewModels getInstance()
{
if(instance == null)
{
instance = new ListItemViewModels("Assets/EAT.jpg");
}
return instance;
}
private ObservableCollection<Models.ListItem> allItems = new ObservableCollection<Models.ListItem>();
public ObservableCollection<Models.ListItem> AllItems
{
get
{
return this.allItems;
}
}
......
......
......
}
}此类为单例模式,类中还包括:
- 构造函数:初始化集合内容。
- AddListItem:新增一项Item。
- RemoveListItem:减少一项Item。
- UpdateListItem:更新一项Item。
- getSearchItemInfo:查询Item。
内容太长,详见github。
实现图片的上传。首先在MainPage.xaml 和 NewPage.xaml中添加按钮:
1
2
<AppBarButton x:Name="SelectPictureButton" Icon="Pictures" Label ="select" Click="SelectPicture_Click"
Height="40" Width="40" RelativePanel.Below="img"></AppBarButton>然后在对应的.xaml.cs文件中实现Click函数:
1
2
3
4
5
6
7
8
9
10
11
12
13
14
15
16
17
18
19
20
21
22
public async void SelectPicture_Click(object sender, RoutedEventArgs e)
{
FileOpenPicker picker = new FileOpenPicker();
picker.ViewMode = PickerViewMode.Thumbnail;
picker.SuggestedStartLocation = PickerLocationId.Desktop;
picker.FileTypeFilter.Add(".jpg");
picker.FileTypeFilter.Add(".png");
picker.FileTypeFilter.Add(".jpeg");
picker.FileTypeFilter.Add(".bmp");
picker.FileTypeFilter.Add(".jif");
StorageFile file = await picker.PickSingleFileAsync();
if (file != null)
{
IRandomAccessStream stream = await file.OpenAsync(FileAccessMode.Read);
BitmapImage bmpimage = new BitmapImage();
bmpimage.SetSource(stream);
img.Source = bmpimage;
imgPath = file.Path.Substring(file.Path.LastIndexOf('\\') + 1);
}
}
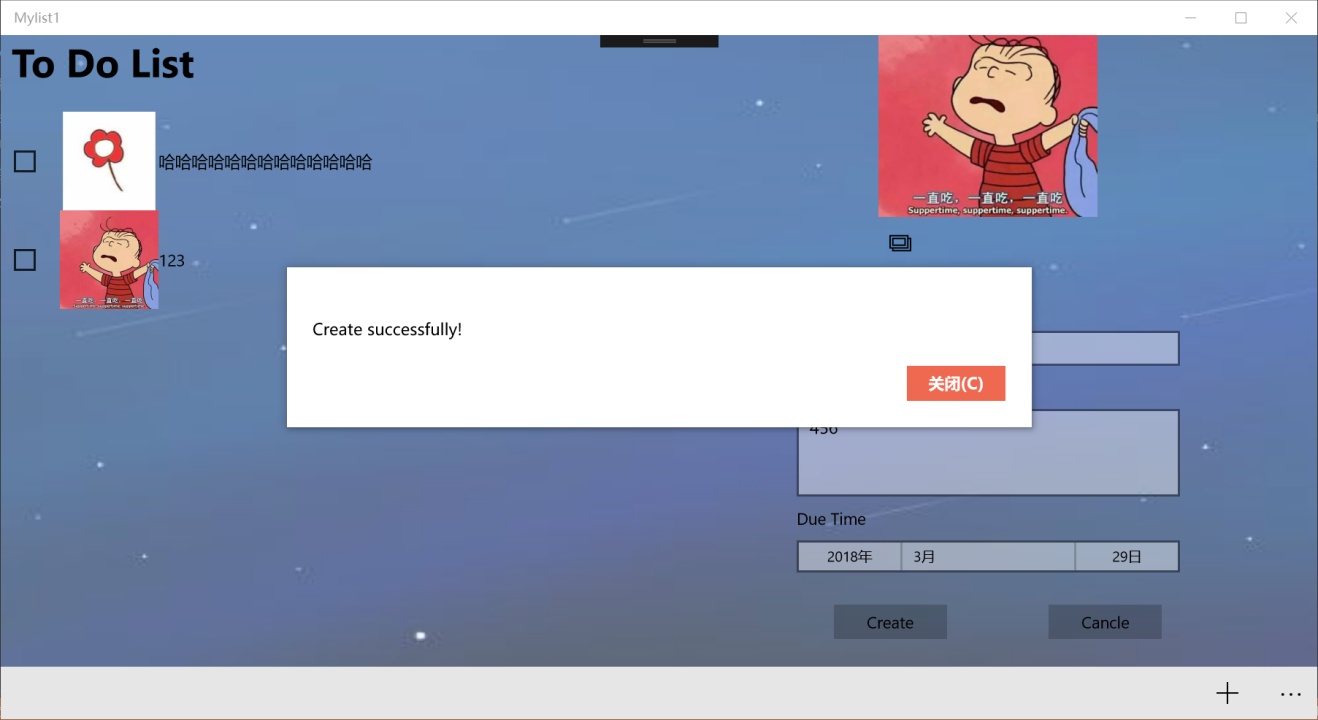
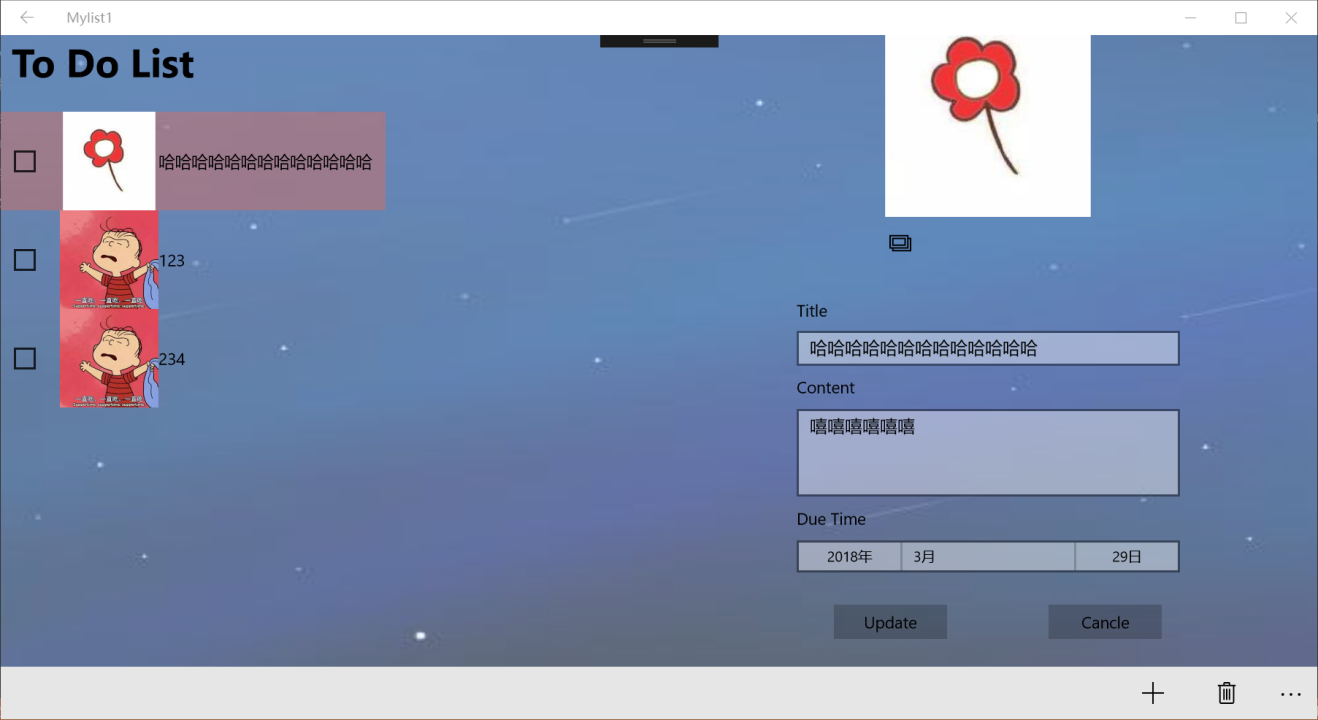
效果图:
三种状态:

创建新Item:
点击Item显示详情并且显示Update按钮进入可更新状态:
总结:
未完待续。